Motion Classifier with Edge Impulse
Hello! Happy new year everyone:) On the very first day of the year, I completed a motion classifier project with Edge Impulse & Arduino. I would like to tell you the steps of the project, some problems I’ve faced with and how to solve them.
I would like to thank Coursera and Edge Impulse to give us a chance to learn embedded machine learning. Find more about the lecture: Coursera
1. Connection
After creating a new project on Edge Impulse, I plugged in my Arduino board to my laptop, then update the firmware —> this is very important do not skip this step.
Then I open the command prompt and write:
edge-impulse-daemon --clean
I can connect my Arduino board with my new project in Edge Impulse. Go back to your project on the Edge Impulse website and check if the Arduino is connected. If you encountered with a problem, you can read my previous post
2. Collect Data
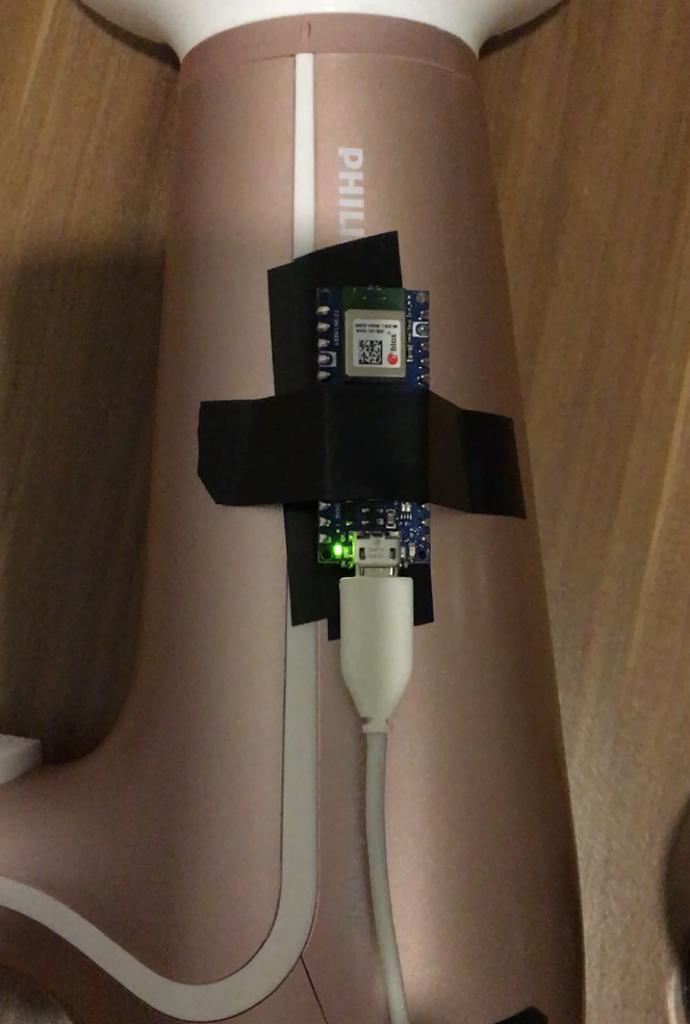
This is the funny part. You need to choose an item in your home that you can collect motion data. I wish to have a remote-controlled car :( Anyway, I decided to use my hairdryer and taped the board to the hairdryer as you can see below.
–
–
Select Data- Acquisition, write the label name, and start sampling! There are 4 classes in my project, off, light, light_move, and heavy.
off: not working
light: working in mode 1
light_move: working in mode 1 and waving
heavy: working in mode 2
Here is a short video of the collecting data process:
–
–
I’ve collected 8 minutes of data (2 minutes for each class) and 2 minutes for test data.
3. Train & Test Model
Impulse design is really easy thanks to Edge Impulse. First, you need to create impulse. You will select processing block and learning block. The processing block will help you to generate features, and the learning block is the classification model.
–

–
You can check my previous post about Fourier Transform, It is used for generating features, fortunately, the Edge Impulse handles the Fouirer Transform for us.
After feature generation, I designed a neural network with 2 hidden layers and dropout layer with probability of 0.2
import tensorflow as tf
from tensorflow.keras.models import Sequential
from tensorflow.keras.layers import Dense, InputLayer, Dropout, Conv1D, Conv2D, Flatten, Reshape, MaxPooling1D, MaxPooling2D, BatchNormalization, TimeDistributed
from tensorflow.keras.optimizers import Adam

# model architecture
model = Sequential()
model.add(Dense(64, activation='relu',
    activity_regularizer=tf.keras.regularizers.l1(0.00001)))
model.add(Dense(32, activation='relu',
    activity_regularizer=tf.keras.regularizers.l1(0.00001)))
model.add(Dropout(0.2))
model.add(Dense(classes, activation='softmax', name='y_pred'))

# this controls the learning rate
opt = Adam(lr=0.0005, beta_1=0.9, beta_2=0.999)
# this controls the batch size, or you can manipulate the tf.data.Dataset objects yourself
BATCH_SIZE = 32
train_dataset = train_dataset.batch(BATCH_SIZE, drop_remainder=False)
validation_dataset = validation_dataset.batch(BATCH_SIZE, drop_remainder=False)
callbacks.append(BatchLoggerCallback(BATCH_SIZE, train_sample_count))

# train the neural network
model.compile(loss='categorical_crossentropy', optimizer=opt, metrics=['accuracy'])
model.fit(train_dataset, epochs=30, validation_data=validation_dataset, verbose=2, callbacks=callbacks)
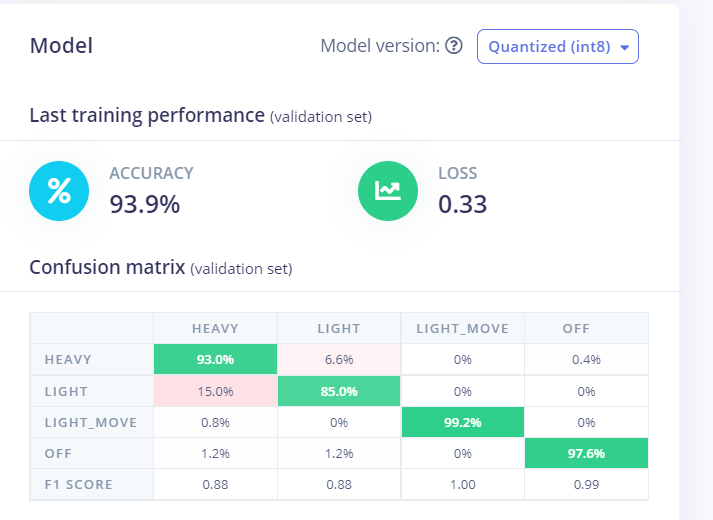
Here is the validation score:
–
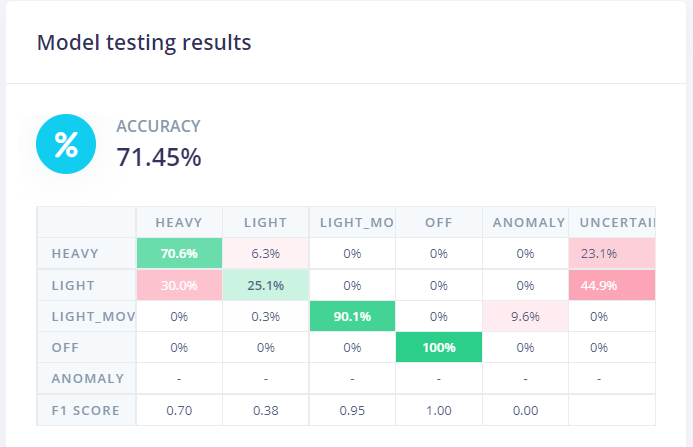
Then I choose model testing. The test score is 71.45%. I am happy with this result.
–
4. Deployment
You can read my previous post about deployment. Click Deployment, select Arduino, and the quantized version of the project (Please read more about Tensorflow Lite). Click build –> this will give you a zip file.
Now please close the terminal if it still opens. (I got “port is busy” error during uploading before I close the terminal)
Open Arduino IDE.
- Sketch –> Include library –> Add Zip Library
- File –> Examples –> motion_classifier_inferencing –> nano_ble33_sense_accelerometer –> upload –> this will take around 10 minutes.
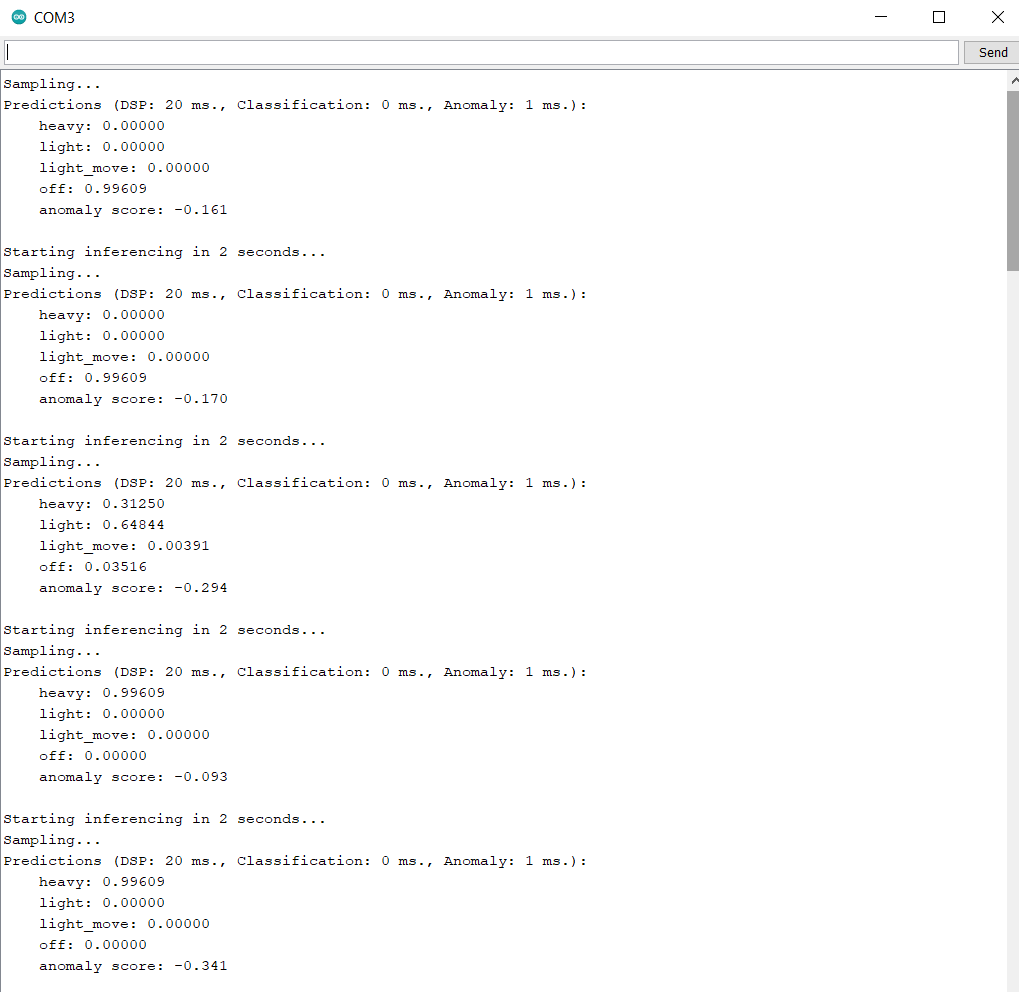
Then you can open Serial Monitor for live classification. Here is a short video for live classification. There are some errors between the targets light and heavy but that’s ok :)
–
5. Improvement
I tried to increase the test accuracy for all classes. First I changed the model architecture:
import tensorflow as tf
from tensorflow.keras.models import Sequential
from tensorflow.keras.layers import Dense, InputLayer, Dropout, Conv1D, Conv2D, Flatten, Reshape, MaxPooling1D, MaxPooling2D, BatchNormalization, TimeDistributed
from tensorflow.keras.optimizers import Adam

# model architecture
model = Sequential()
model.add(Dense(128, activation='relu',
    activity_regularizer=tf.keras.regularizers.l1(0.00001)))
model.add(Dense(64, activation='relu',
    activity_regularizer=tf.keras.regularizers.l1(0.00001)))
model.add(Dropout(0.25))
model.add(Dense(classes, activation='softmax', name='y_pred'))

# this controls the learning rate
opt = Adam(lr=0.0001, beta_1=0.9, beta_2=0.999)
# this controls the batch size, or you can manipulate the tf.data.Dataset objects yourself
BATCH_SIZE = 32
train_dataset = train_dataset.batch(BATCH_SIZE, drop_remainder=False)
validation_dataset = validation_dataset.batch(BATCH_SIZE, drop_remainder=False)
callbacks.append(BatchLoggerCallback(BATCH_SIZE, train_sample_count))

# train the neural network
model.compile(loss='categorical_crossentropy', optimizer=opt, metrics=['accuracy'])
model.fit(train_dataset, epochs=30, validation_data=validation_dataset, verbose=2, callbacks=callbacks)
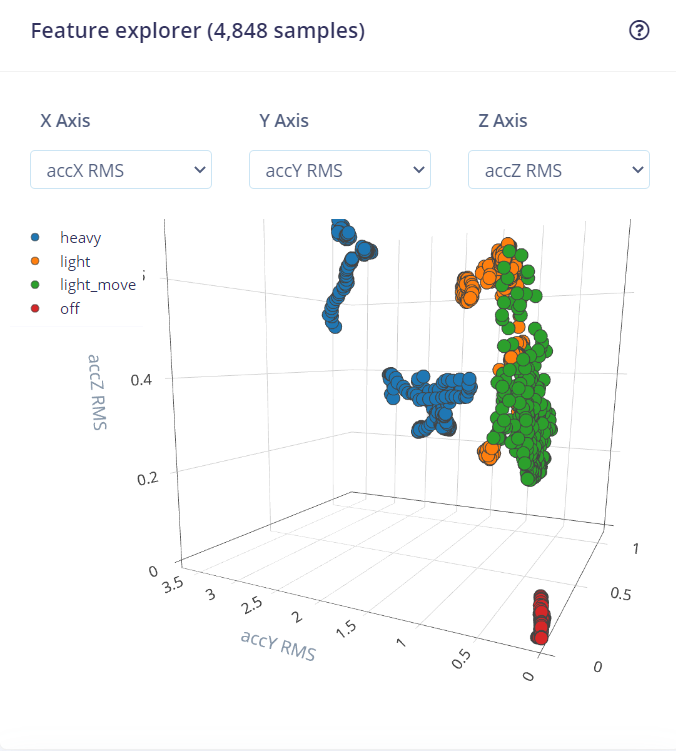
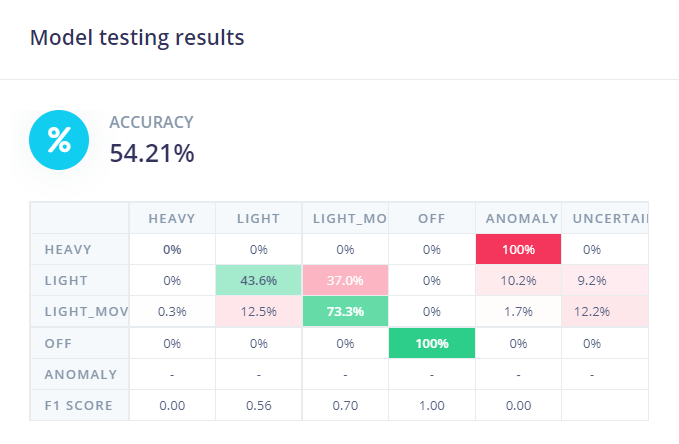
Then, I’ve changed the parameters in Spectral features.
Default filter value is low. Let’s try “heavy” filter. The features separates the classes well but the test accuracy is worse than the low filter:
–
–
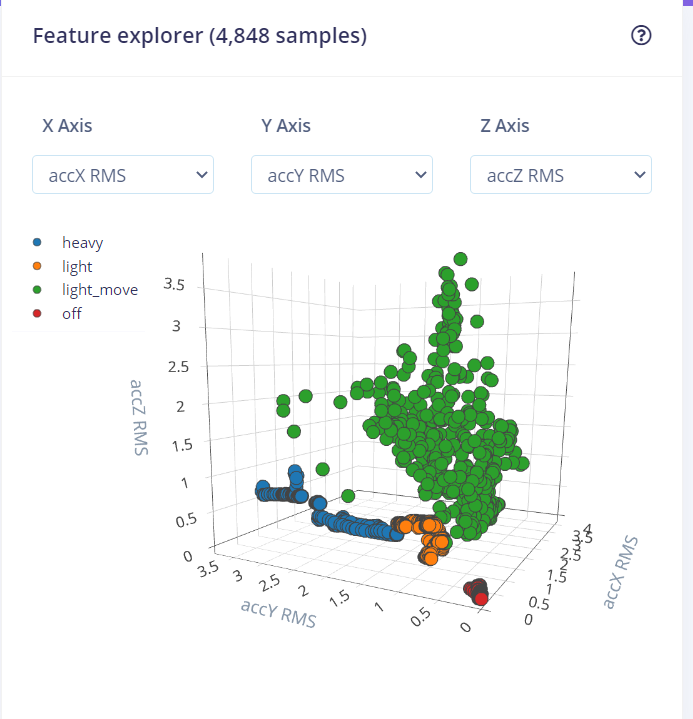
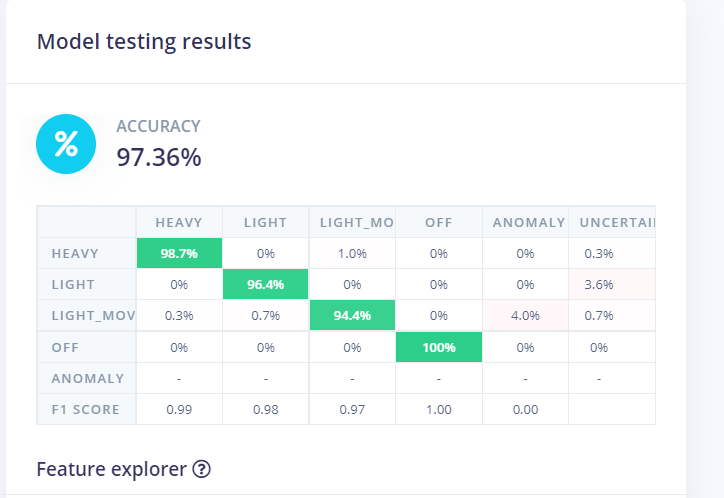
Filter None gives very good result for test data :)
Key Words
Tiny ML, Arduino, Edge Impulse, Motion, Classification